Project BrundleFab
Electronics
Arduino
Seed Studio SD Card v3.1 Shield
Well, connecting to an Arduino Mega2560 doesn't just snap on and work. You need to route some pins:
| MEGA Pin | SD Shield | Function |
|---|---|---|
| ICSP1 | D12 | MOSI |
| ICSP2 | 5v | 5v |
| ICSP3 | D13 | SCK |
| ICSP4 | D11 | MISO |
| ICSP6 | GND | Gnd |
| D53 | D10 | SS |
Use the arduino SD library, with a 'const int chipSelect=SS;' and you are good to go.
HP F4480
I am using a pile of trashed HP F4480 DeskJet printers as a source of motors, gears, and encoders.
Here are some information I have discovered about the internals of this printer:
Rotary optical encoder board
This board monitors the 1200 DPI optical encoder disk attached to the main paper handling roller in the printer.
It uses quadrature encoding, and can monitor both forward and reverse direction.
I am using the 'Encoder' library from the [1] Arduino library collection.
Pin 1 is the kerf on the CPU board connection
| Pin | Function |
|---|---|
| 4 | Output A |
| 3 | Vcc 3.3v |
| 2 | Output B |
| 1 | Gnd |
Linear Encoder
The HP F4480 printhead carriage monitors a 1200 DPI optical encoder strip, which is the feedback to the carriage motor.

DC Motors
All three DC motors (printhead, paper handling, and scanner carriage) are driven at 30v, PWM at 10% for nominal operation.
The printhead and paper handling motors are larger driving gear motors, the scanner carriage motor is a small motor driving a worm gear.
Print Media
Granulated Sugar + Water
Process
- Lay down 10mm of granulated sugar
- Sift a layer of 1mm of granulated sugar
- Apply 1mm droplets of (colored) water to the granulated sugar via a needle bottle (unknown tip size)
- Go to 2. until part build volume is complete
- Lay down 10mm of granulated sugar
- Heat at 120C (250F) in oven for 1 hour
- Let cool
- Remove from build container, and remove excess sugar
Results
The resulting object was stiff, but easily crumbled. Water dispersion through the granulated sugar had an approx 5mm radius, and substantially filled in the interior of the part (wireframe cube).

Analysis
- Droplet size should be smaller
- Either a finer granularity or pressure packing of the media should reduce the spot size of the print head
- A food safe adhesive should be tried to increase bonding strength
- In-powder adhesive (such as meringue powder) activated by water
- In-suspension adhesive (such as egg whites)
Powdered Confectionery Sugar + Water
- Lay down 10mm of granulated sugar
- Sift a layer of 2mm of granulated sugar, and pack down to 1mm.
- Apply 1mm droplets of (colored) water to the powdered sugar via a needle bottle (unknown tip size)
- Go to 2. until part build volume is complete
- Lay down 10mm of granulated sugar
- Heat at 120C (250F) in oven for 1 hour
- Let cool
- Remove from build container, and remove excess sugar
Results
Sugar did not re-crystallize, I suspect the cornstarch at fault here.
Analysis
- Powdered Confectionery Sugar is not suitable for printing, due to the cornstarch content.
Powdered Sugar/Meringue Powder + Alcohol/Water
- Powder base is granulated sugar and meringue powder
- Adhesive is alcohol and water
Procedure
- Lay down 10mm of powder
- Sift a layer of 2mm of powder, and pack down to 1mm.
- Apply 1mm droplets of (colored) adhesive to the powder via a needle bottle (unknown tip size)
- Go to 2. until part build volume is complete
- Lay down 10mm of granulated sugar
- Heat at 120C (250F) in oven for 1 hour
- Let cool
- Remove from build container, and remove excess sugar
Results
- Sugar/Meringue powder is % by mass
- Alcohol/Water is % by volume
| Sugar | Meringue Powder | Water | Alcohol | Results |
|---|---|---|---|---|
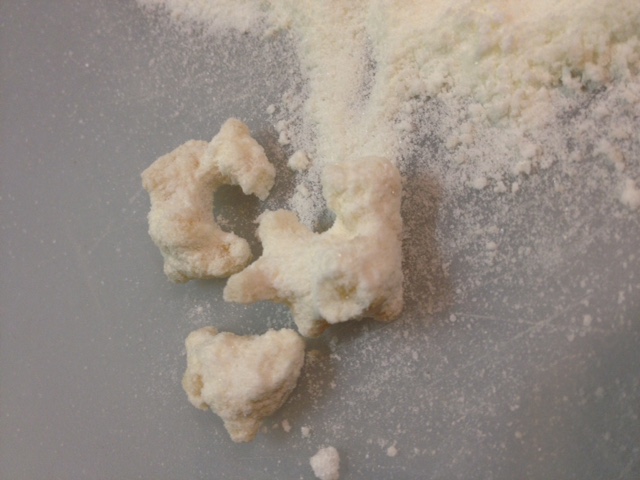
| 90% | 10% | 50% | 50% | Small droplet size (1mm), no capillary creep from the droplets; resulting object could be rinsed of excess powder |
Analysis
- Should be a sufficient working material, need to experiment with different ratios.
-
90%/10%+50%/50% (dry)
-

90%/10%+50%/50% (wet)

